
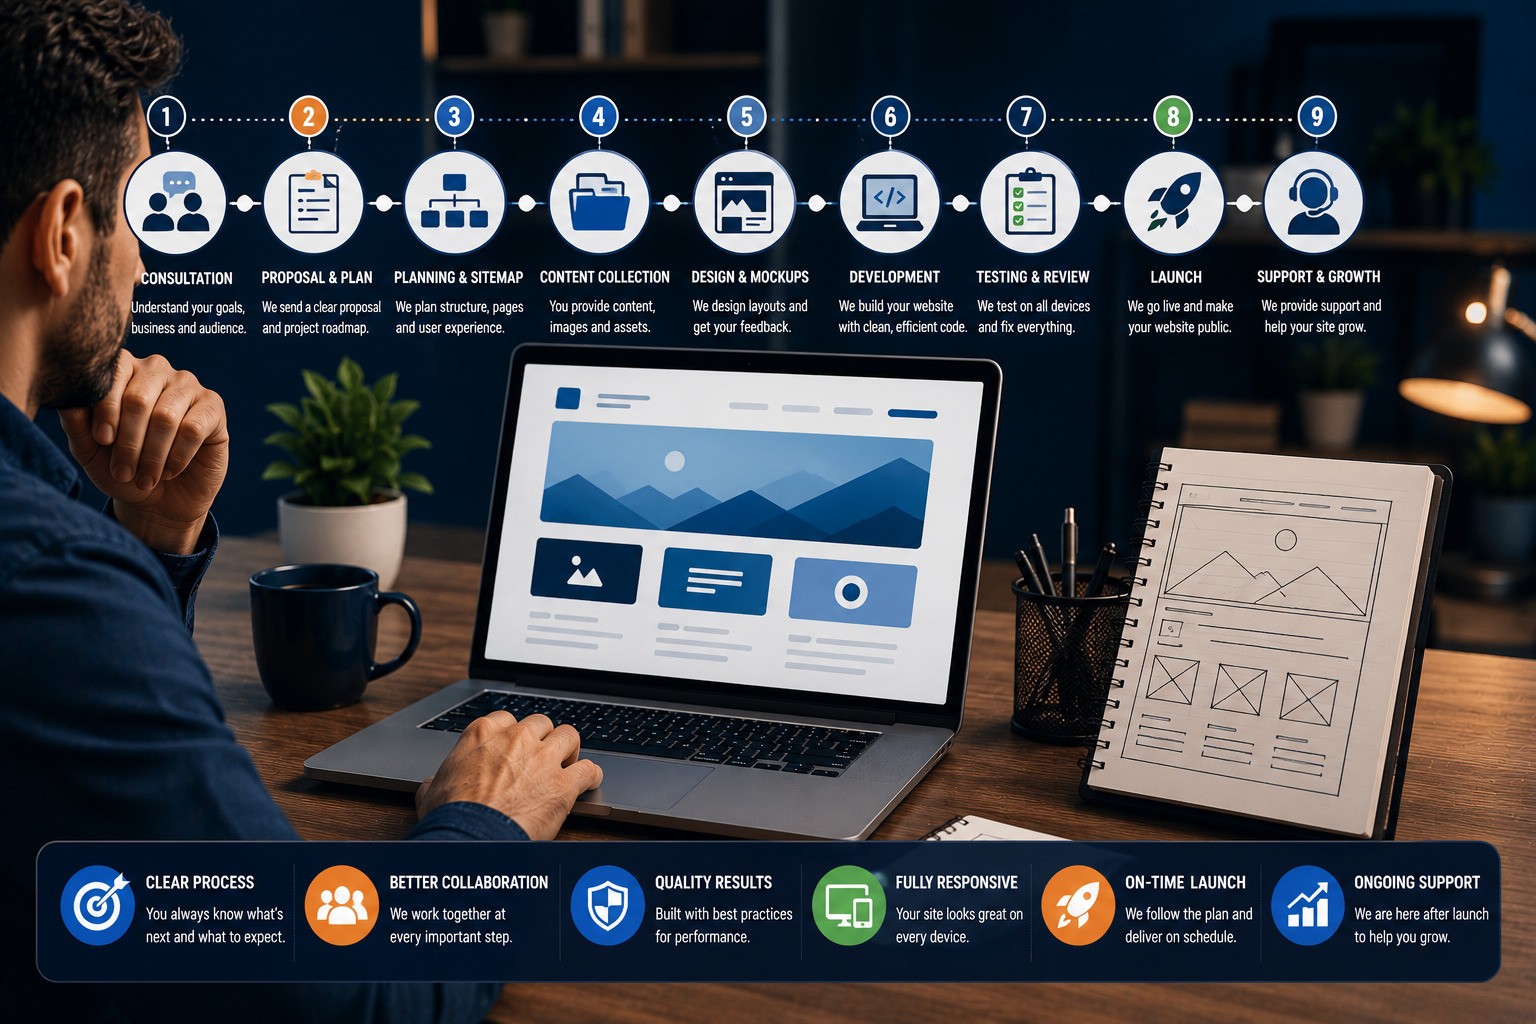

Understanding how a professional website project works from consultation to launch helps clients know what to expect before they hire a website designer or agency. A good website project is not just about making pages look attractive. It involves planning, strategy, content, design, development, testing, feedback and launch preparation.
Many clients start a website project without knowing the full process. This can lead to delays, missing content, unclear expectations, repeated revisions or confusion about who is responsible for what.
A professional website project usually follows a clear workflow: discovery, proposal, planning, content collection, design, development, review, testing, launch and post-launch support.
This guide explains each stage so business owners, entrepreneurs, course creators and organisations can prepare properly and work more confidently with a website designer.
Quick answer
A professional website project starts with a consultation to understand the business goals, target audience, pages, features, budget and timeline. After that, the designer prepares a proposal, collects content and access, plans the structure, designs the pages, builds the website, reviews feedback, tests the site, launches it and provides post-launch support or maintenance.
Every project is different
The exact process depends on the website type, platform, number of pages, content readiness, custom features and approval speed. A simple business website may move faster than an ecommerce store, LMS platform or custom website redesign.
Why the Website Project Process Matters
A clear website process helps both the client and the designer work with less confusion.
A good process helps with:
- Clear expectations
- Accurate pricing
- Better page structure
- Faster content collection
- Fewer unnecessary revisions
- Better design decisions
- More reliable launch preparation
- Improved communication
- Reduced project delays
Without a clear process, the website may become disorganised. The client may not know what to provide, and the designer may not have enough information to build the right solution.
Step 1: Initial Consultation
The consultation is the first serious conversation between the client and the website designer.
The purpose is to understand the business, the problem, the desired website and whether the designer is a good fit for the project.
During the consultation, the designer may ask about:
- Your business type
- Your target audience
- Your current website, if you have one
- Your website goals
- Your required pages
- Your services or products
- Your preferred platform
- Your required features
- Your budget range
- Your expected timeline
- Examples of websites you like
What the client should prepare
Before the consultation, prepare a short summary of your business, your goals and what you want the website to help you achieve.
Consultation goal
The consultation should clarify whether the project needs a simple website, a redesign, an ecommerce store, a booking website, an LMS platform or a more advanced custom setup.
Step 2: Proposal and Scope
After the consultation, the designer or agency may prepare a proposal.
The proposal explains what will be included, what is not included, the estimated timeline and the project cost.
A professional proposal may include:
- Project overview
- Recommended website platform
- Number of pages
- Included features
- Design approach
- Content responsibilities
- SEO setup included
- Revision policy
- Timeline
- Payment terms
- Maintenance options
Why scope matters
Scope protects both sides. It helps the client know what they are paying for and helps the designer avoid unlimited or unclear work.
If additional pages or features are requested later, they may require a separate quote or timeline adjustment.
Step 3: Client Onboarding
Once the proposal is accepted and the project begins, the onboarding stage helps collect all important information.
Onboarding may include:
- Project questionnaire
- Contract or agreement
- Initial payment
- Brand asset collection
- Content request
- Access request
- Project timeline confirmation
- Communication channel setup
Common items requested from the client
- Logo files
- Brand colours
- Images
- Website copy
- Domain access
- Hosting access
- Platform login
- Payment gateway details
- Examples and inspiration
The faster the client provides these materials, the smoother the project usually becomes.
Step 4: Website Planning
Website planning turns the project goals into a clear structure.
This stage may include:
- Sitemap planning
- Page list confirmation
- Navigation planning
- User journey planning
- Call-to-action planning
- Feature mapping
- Content placement
- Basic SEO structure
Why planning comes before design
A website should not be designed randomly. The structure should support the customer journey.
For example, a visitor may land on the homepage, read about the service, check testimonials, review FAQs and then submit a contact form. The website should make that journey easy.
Step 5: Content Collection
Content is one of the most important parts of a website project.
Website content can include:
- Homepage text
- About page text
- Service descriptions
- Product descriptions
- FAQs
- Testimonials
- Team bios
- Portfolio details
- Contact details
- Legal policy text
Who writes the content?
Sometimes the client provides all content. Sometimes the designer helps organise and refine it. In other projects, a copywriter may be involved.
Even when the designer helps with copy, the client still needs to provide accurate business information.
Step 6: Website Design
The design stage focuses on how the website will look and feel.
Design decisions include:
- Page layout
- Header and navigation
- Hero section
- Typography
- Colours
- Image style
- Buttons
- Spacing
- Section structure
- Mobile layout
Design should support function
A website should look professional, but design is not only about appearance. Good design helps users understand the message, navigate the pages and take action.
Design review
The client may review design drafts or page mockups and provide feedback before development continues.
Step 7: Website Development
Development is where the approved design is built into a working website.
Depending on the platform, development may include:
- WordPress setup
- Theme or builder configuration
- Page building
- Responsive layout setup
- Menu setup
- Form setup
- Plugin configuration
- Performance optimisation
- Security basics
- Content upload
Common platforms
Website projects may be built with WordPress, Shopify, Wix, Squarespace, Webflow, LearnWorlds or other platforms depending on the business need.
Step 8: Feature Setup
Many websites require more than static pages.
Common features include:
- Contact forms
- Booking forms
- Payment gateways
- Email signup forms
- Live chat
- Blog setup
- Product catalogue
- Course pages
- Member areas
- CRM integrations
- Analytics tracking
- Cookie consent banner
Feature setup may require third-party accounts, API keys, login access or business information from the client.
Step 9: Client Review and Revisions
After the website is built, the client reviews it and provides feedback.
Good feedback should be:
- Specific
- Organised by page
- Clear about what needs changing
- Focused on agreed project goals
- Sent in one organised document or message
Avoid vague feedback
Feedback like “make it pop” or “I do not like it” is hard to act on. Better feedback explains what feels wrong and what should change.
Revision limits
Many professional projects include a set number of revision rounds. Additional changes outside the agreed scope may require extra time or cost.
Step 10: Basic SEO Setup
Before launch, the website should include basic SEO setup so search engines can understand the pages more clearly.
Basic SEO may include:
- SEO titles
- Meta descriptions
- Clean page URLs
- Heading structure
- Image alt text
- Internal links
- Sitemap setup
- Robots settings
- Search Console connection
- Analytics setup
SEO is not instant ranking, but proper setup gives the website a stronger foundation.
Step 11: Testing and Quality Checks
Testing helps catch issues before visitors use the website.
Website testing may include:
- Desktop layout check
- Mobile layout check
- Tablet layout check
- Browser testing
- Contact form testing
- Button and link testing
- Payment testing if relevant
- Menu testing
- Page speed review
- Image optimisation
- 404 page check
- SSL check
Why testing matters
A website may look good but still have broken forms, missing links, mobile layout issues or slow-loading pages. Testing reduces launch problems.
Step 12: Website Launch
Launch is when the website becomes live on the final domain or the redesigned site replaces the old one.
Launch tasks may include:
- Connecting the domain
- Updating DNS records
- Enabling SSL
- Removing coming soon mode
- Checking pages live
- Submitting sitemap
- Testing forms again
- Checking tracking tools
- Backing up the website
Launch timing
Launch should happen when the site has been reviewed, tested and approved. Rushing launch before testing can create avoidable problems.
Step 13: Training and Handover
After launch, the designer may provide a handover or training session.
Training may cover:
- How to log in
- How to edit text
- How to upload images
- How to publish blog posts
- How to manage forms
- How to review enquiries
- How to update products
- How to perform basic maintenance
Handover materials
The designer may provide a short guide, screen recording or support notes depending on the project package.
Step 14: Post-Launch Support
A website needs care after launch.
Post-launch support may include:
- Bug fixes within an agreed period
- Plugin updates
- Backups
- Security monitoring
- Speed checks
- Content updates
- Analytics review
- SEO improvements
- New page creation
Some designers offer maintenance plans. This can be useful for businesses that do not want to manage technical updates themselves.
Typical Website Project Timeline
Timelines vary depending on scope and content readiness.
| Project Type | Possible Timeline | Main Factors |
|---|---|---|
| Simple business website | 1 to 3 weeks | Few pages, ready content, simple features |
| Standard service website | 3 to 6 weeks | Multiple pages, forms, SEO setup, revisions |
| Ecommerce website | 4 to 8+ weeks | Products, payments, shipping, policies, testing |
| LMS or course website | 4 to 10+ weeks | Courses, users, payments, lessons, automations |
| Custom website redesign | 4 to 12+ weeks | Migration, strategy, content rewrite, integrations |
Projects move faster when the client provides content, assets and feedback on time.
What the Client Should Do During the Project
The client plays an important role even when the designer handles the technical work.
Clients should:
- Provide accurate business information
- Share content and images on time
- Give access when needed
- Review pages carefully
- Provide clear feedback
- Make decisions quickly
- Respect the agreed scope
- Test important forms and processes
- Approve launch when ready
A website project works best when both the client and designer treat it as a collaboration.
Common Website Project Mistakes to Avoid
- Starting without clear goals
- Not preparing content
- Delaying feedback
- Changing direction too often
- Adding features without adjusting scope
- Not testing forms before launch
- Ignoring mobile design
- Using poor-quality images
- Forgetting SEO basics
- Launching without backups
- Not planning maintenance
Website Project Checklist
Before development
- Consultation completed
- Project scope approved
- Timeline confirmed
- Business goals defined
- Page list confirmed
- Content collected
- Brand assets provided
- Access details available
Before launch
- Pages reviewed
- Revisions completed
- Forms tested
- Mobile layout checked
- SEO basics added
- Analytics connected
- SSL active
- Backup created
Final Verdict: How a Professional Website Project Works From Consultation to Launch
Understanding how a professional website project works from consultation to launch helps clients prepare better and avoid unnecessary delays.
A strong project begins with a clear consultation and proposal. It continues with proper planning, content collection, design, development, testing, revisions and launch preparation.
The designer is responsible for turning the strategy and materials into a professional website, but the client’s preparation and feedback are also important.
When both sides follow a clear process, the final website is more likely to look professional, function properly and support the business goals it was created for.
Our recommendation
Before starting a website project, make sure your goals, pages, content, assets, access details and timeline are clear. A prepared client and a structured designer can complete a better website with fewer delays.
Frequently Asked Questions
How does a professional website project work?
A professional website project usually includes consultation, proposal, onboarding, planning, content collection, design, development, testing, launch and post-launch support.
What happens during a website consultation?
The designer learns about your business, goals, audience, pages, required features, budget, timeline and current website challenges.
How long does a website project take?
A simple website may take one to three weeks, while larger ecommerce, LMS or custom projects can take several weeks or more.
What should I prepare before starting a website project?
Prepare your goals, page list, content, images, logo, brand colours, access details, examples, budget and timeline.
Can a website designer help with content?
Many designers can help organise or improve content, but the client still needs to provide accurate business information.
What is website project scope?
Scope defines what is included in the project, such as pages, features, revisions, platform setup, timeline and deliverables.
Why do website projects get delayed?
Common delays happen because of missing content, late feedback, unclear goals, missing access details or repeated scope changes.
What is the design stage of a website project?
The design stage focuses on layout, colours, typography, imagery, navigation, calls to action and the overall visual direction.
What is the development stage?
The development stage turns the approved design and content into a working website using the selected platform.
Should SEO be included before launch?
Yes. Basic SEO setup such as page titles, meta descriptions, URLs, headings, alt text and sitemap should be considered before launch.
What should be tested before launch?
Test mobile layout, links, buttons, forms, menus, checkout if relevant, speed, SSL, tracking and important user journeys.
What happens after a website launches?
After launch, the site may need training, monitoring, backups, updates, analytics review, SEO improvements and ongoing maintenance.
Do I need a maintenance plan?
A maintenance plan is useful if you want help with updates, backups, security, content changes and technical monitoring.
Can I request changes after launch?
Yes, but changes after launch may be covered by a support period or quoted separately depending on the agreement.
What makes a website project successful?
Clear goals, good planning, prepared content, strong communication, organised feedback, proper testing and ongoing improvement all contribute to success.
Ready to Start a Professional Website Project?
Teemikemedia Agency can help you plan, design, build and launch a professional website that supports your business goals and gives your visitors a clear path to take action.