
Adding a blog to your LearnWorlds school gives you a dedicated place to publish tutorials, announcements, industry insights, course updates and educational content for potential and existing learners.
A well-managed blog can support your online school by answering common questions, introducing your courses, sharing practical knowledge and attracting visitors who may later become students.
LearnWorlds includes a built-in blog and visual website editor, so you can create and design blog posts without installing a separate content-management system. You can begin with a blank layout, use a premade template or use the platform’s AI tools to help generate and refine content.
This guide explains how to set up a blog in LearnWorlds, configure the blog page, create a new post, manage the title and permalink, assign categories, upload a featured image, customise the page layout, review SEO settings and publish the finished article.
Quick answer
To set up a blog in LearnWorlds, open the Website area of your school, locate the Blog section and enable or open the blog page. Configure the page name and description, then create a new post from a blank template, a premade template or the AI option. Add the title, slug, publication status, date, categories, description, featured image and author. Design the post with sections and widgets, review its SEO settings and publish it when ready.
Why Add a Blog to Your LearnWorlds School?
A LearnWorlds school is not limited to hosting lessons and courses. Its website can also act as a complete content and marketing platform.
A blog can help you:
- Publish educational tutorials
- Answer frequently asked questions
- Explain topics related to your courses
- Share platform or business updates
- Promote new courses and programmes
- Demonstrate professional knowledge
- Attract visitors through search engines
- Create content for email and social media campaigns
- Build trust before asking visitors to enrol
- Keep existing students informed
Blog content can support course sales
A useful article can introduce a problem, explain a solution and naturally direct the reader towards a relevant course or learning programme.
For example, a school selling a digital-marketing course could publish articles about content strategy, email campaigns, search visibility and social media planning.
Your blog should support the school’s purpose
A course platform should avoid publishing random content purely to increase traffic. Choose topics that are useful to the audience your courses are designed to serve.
Blogging principle
Use the blog to educate your audience, demonstrate expertise and create a natural path towards relevant courses or programmes.
What You Need Before Starting
Prepare the following before creating the blog.
- An active LearnWorlds school
- Administrator or suitable website-editing access
- A clear blog name
- A short blog description
- At least one article topic
- A suitable featured image
- An author name
- Relevant blog categories
- Your preferred brand colours and fonts
Plan the blog structure first
Decide what types of content you will publish and how they should be organised.
Possible category examples include:
- Tutorials
- Course Updates
- Student Resources
- Business
- Marketing
- Industry News
- Case Studies
Prepare the article outside LearnWorlds when necessary
For longer posts, it may be easier to draft and proofread the content in a document before building the final page in LearnWorlds.
Preparation principle
Define the blog’s audience, categories and content purpose before designing the first post.
Watch the Video Tutorial
The video below demonstrates how to enable a LearnWorlds blog, create a new post, complete the post details and customise the page design.
Interface update
LearnWorlds may change dashboard labels and menu locations over time. The current platform also provides AI-assisted options for generating or enhancing blog posts, which may not appear in older video recordings.
Step 1: Open the LearnWorlds Blog Area
Log in to your LearnWorlds school as an administrator.
Open the website-management area and locate the Blog section. Depending on the version of the dashboard, the blog may appear directly inside the Website area or through the website editor and page manager.
Look for options such as:
- Website
- Design
- Edit Website
- Pages
- Blog
- Manage Blog Posts
Open the existing blog page
LearnWorlds normally provides a blog feature within the school website. Open it to review the blog page and the existing post-management area.
Enable the blog when required
If the blog is not currently active or visible, use the available option to enable or publish the blog page.
Navigation principle
Use the Website and page-management areas to open the blog page and the separate list of blog posts.
Step 2: Configure the Main Blog Page
The main blog page acts as the archive where visitors can browse your published posts.
Choose a clear page name
Common choices include:
- Blog
- Resources
- Insights
- Learning Hub
- News and Updates
Choose a name that your audience can understand immediately.
Add a useful description
The blog-page description should explain what readers can expect.
For example:
Explore practical tutorials, course updates and educational resources created to help you develop your professional skills.
Check the page URL
Use a short and understandable slug, such as:
/blog
or:
/resources
Review page visibility
Make sure the page is public when you are ready for visitors to access it.
Blog-page principle
Give the main blog page a clear name, useful description and simple URL that match the school’s content strategy.
Step 3: Create a New Blog Post
Open the blog-post management area and click the plus icon or the option to add a new post.
LearnWorlds will then ask how you want to begin creating the article.
Current creation options may include:
- Use a premade template
- Start with a blank template
- Enhance a template with AI
- Create the complete post with AI
Choose the method that matches your experience
Beginners may find a premade template easier, while experienced designers may prefer a blank post with a custom section structure.
Creation principle
Start with the option that gives you enough design flexibility without making the process unnecessarily difficult.
Step 4: Choose a Template, Blank Page or AI Option
Use a premade template
A template provides an existing visual structure containing common blog-post sections. You can replace the text, images and colours with your own content.
Use a blank template
A blank template gives you complete control over the design. You will need to add the sections, columns and widgets yourself.
Enhance a template with AI
LearnWorlds may allow you to fill or refine a template using an AI prompt. You can describe the article topic, audience, tone and intended goal.
Create a post with AI
The AI option can generate a complete first draft and may also prepare supporting post information such as the title, description, slug, categories, author information and SEO details.
Always review generated content
AI-generated text should be checked for:
- Accuracy
- Originality
- Brand voice
- Grammar
- Unsupported claims
- Outdated information
- Relevance to your students
Do not publish an AI draft without review
AI can help with drafting and structure, but a knowledgeable person should confirm that the article is accurate, useful and suitable for the school’s audience.
Step 5: Complete the Blog Post Details
Before entering the page editor, LearnWorlds asks for important information about the post.
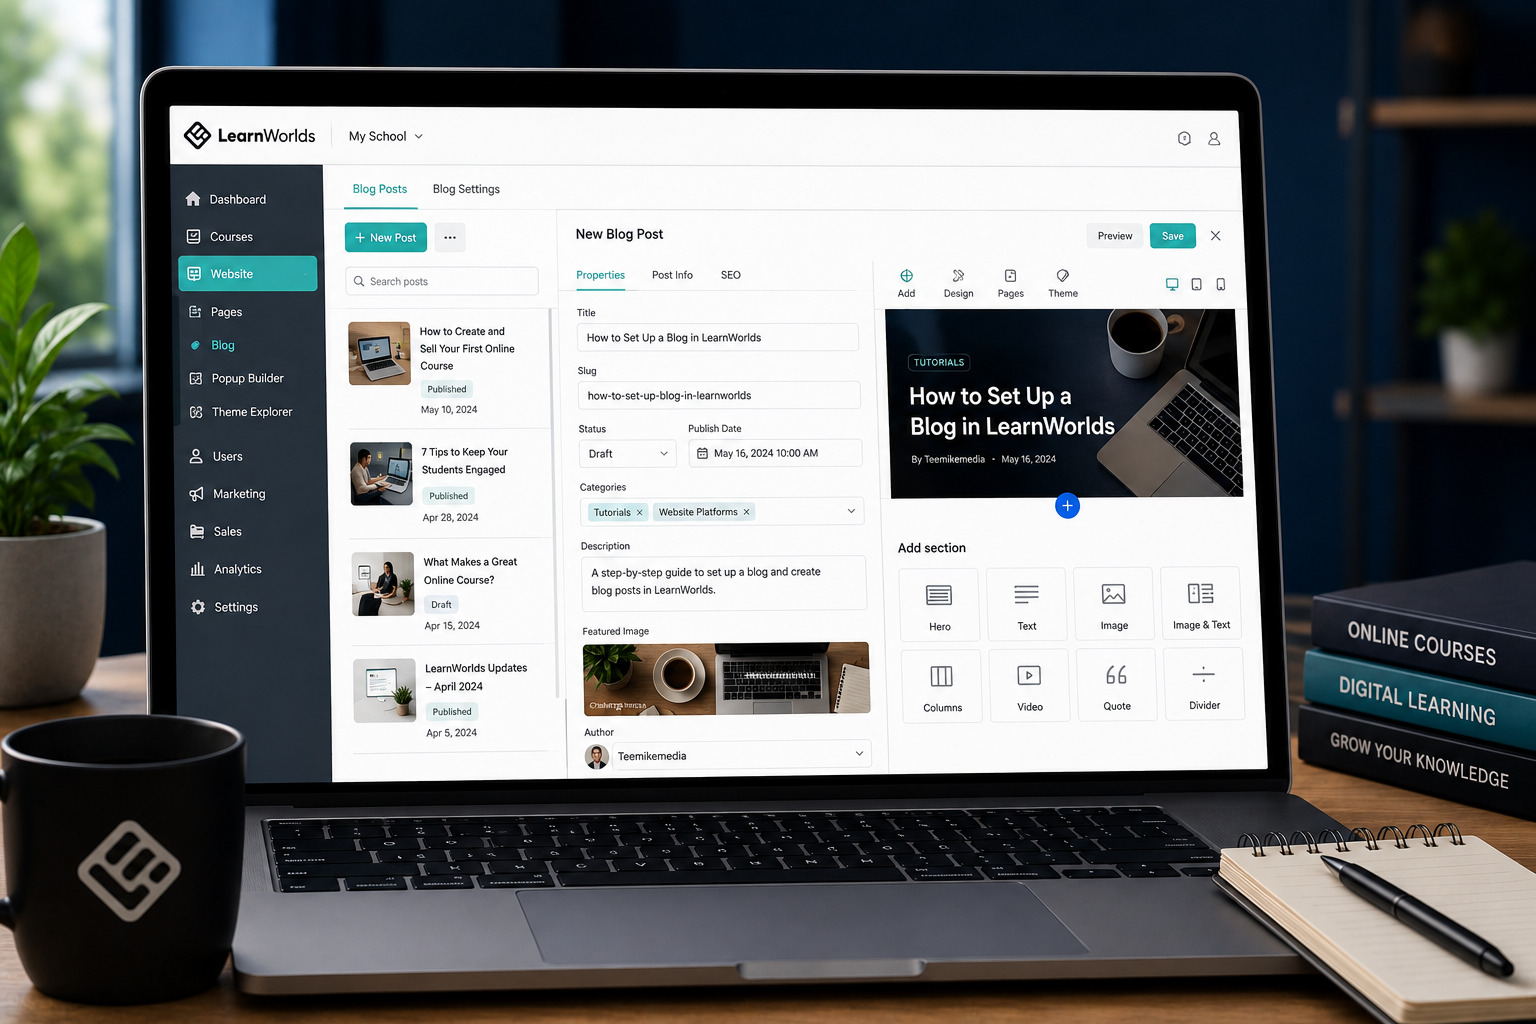
The current post details include:
- Title
- Slug
- Status
- Publication date
- Categories
- Description
- Featured image
- Author
Complete each field carefully because these details influence how the post appears on the main blog page, in search results and when shared.
Post-details principle
Treat the blog-post information as part of the article itself, not as an optional administrative task.
Step 6: Set the Post Title and Slug
Write a descriptive title
The title should explain clearly what the reader will learn.
A useful title might be:
How to Create and Sell Your First Online Course
A vague title such as My New Post provides little value to readers or search engines.
Review the automatically generated slug
LearnWorlds can generate the slug from the title.
For example:
/blog/how-to-create-and-sell-your-first-online-course
Keep the slug short and readable
Remove unnecessary words when they do not improve clarity.
Avoid changing published URLs unnecessarily
Changing a post slug after publication can break existing links unless the old URL is redirected properly.
Check the slug before publishing
Correct spelling mistakes and remove unnecessary characters before the article becomes public.
Step 7: Choose the Status and Publication Date
Use Draft while editing
Keep the post as a draft until the content, design, links and images have been reviewed.
Use Public when ready
Change the status to Public only when the post is complete and suitable for visitors.
Set the publication date
The publication date may be used to determine when the article appears and how it is presented on the blog page.
Check scheduled or future dates carefully
Make sure the time zone and date are correct when preparing content in advance.
Publishing principle
Use Draft for unfinished work and confirm the publication date before making the article public.
Step 8: Add Suitable Blog Categories
Categories organise related posts and help visitors find content that interests them.
Example categories include:
- Online Course Creation
- Business
- Marketing
- Student Success
- Tutorials
- Announcements
Keep category names consistent
Avoid creating several categories that mean almost the same thing, such as:
- Marketing
- Digital Marketing
- Online Marketing
- Marketing Tips
One clear category may be enough unless each group serves a genuinely different purpose.
Do not assign unrelated categories
Choose categories that accurately describe the article rather than assigning every post to every category.
Category principle
Use a small, logical category structure that helps readers browse related articles.
Step 9: Write the Blog Post Description
The description provides a concise summary of the article and may be used in post listings, previews or other areas of the school.
A useful description should:
- Summarise the main topic
- Explain the benefit to the reader
- Use clear language
- Avoid unnecessary repetition
- Match the actual article content
Example description
Learn how to plan, create and launch your first online course using a clear step-by-step process designed for beginner course creators.
Keep it concise
The description should provide enough context without reproducing the entire introduction.
Description principle
Write a short, accurate summary that helps visitors decide whether the article is relevant to them.
Step 10: Upload a Featured Image
The featured image or thumbnail represents the article on the blog page and in other visual listings.
Choose an image that matches the topic
The image should help readers understand the subject without being misleading.
Use consistent image dimensions
Using the same aspect ratio for every blog thumbnail can make the blog archive look cleaner and more professional.
Optimise the file before uploading
- Resize the image appropriately
- Compress the file
- Use a suitable format
- Give the file a descriptive name
- Avoid uploading an unnecessarily large image
Review AI image options carefully
If LearnWorlds provides AI-assisted image generation or editing, check the result for visual errors, inappropriate elements and brand consistency.
Avoid misleading stock images
Use visuals that genuinely relate to the content rather than selecting an attractive image with no connection to the topic.
Step 11: Select the Blog Post Author
Choose the person or brand responsible for the article.
The author may be:
- The school founder
- An instructor
- A subject-matter expert
- A staff member
- The school brand
Use a consistent author name
A consistent byline helps readers recognise who created the content.
Use real expertise where possible
Articles become more trustworthy when the author has relevant knowledge or experience.
Update the author later when necessary
LearnWorlds allows the author and other post information to be edited after the post has been created.
Author principle
Assign the post to a recognisable person or organisation with genuine responsibility for the content.
Step 12: Design the Blog Post
After creating the post, LearnWorlds opens it in the visual website editor.
The post can be built using sections and widgets in the same way as other school pages.
A useful blog-post layout may include:
- Blog-post header
- Title and author details
- Featured image
- Introduction
- Main text sections
- Images or videos
- Quotes or highlights
- Course call to action
- Related resources
Prioritise readability
The design should support the content rather than distracting the reader with excessive animations, backgrounds or decorative elements.
Design principle
Build a clean visual structure that makes the article comfortable to read on desktop and mobile devices.
Step 13: Add Sections and Widgets
Sections are the main building blocks of a LearnWorlds page, while widgets are the individual content elements placed inside those sections.
Possible section types include:
- Hero banners
- Text sections
- Image and text layouts
- Video sections
- Calls to action
- Columns
- Testimonials
- Related courses
Add a new section
Use the plus icon within the editor and select a premade section or build your own layout.
Add widgets inside the section
Widgets may include:
- Headings
- Main text
- Images
- Buttons
- Videos
- Icons
- Dividers
Use headings logically
The article title should act as the main heading, while H2 and H3 headings should organise the remaining sections.
Do not design every paragraph as a separate section
Use enough sections to create structure, but avoid making the post difficult to manage through unnecessary fragmentation.
Step 14: Adjust the Width, Spacing and Layout
LearnWorlds provides layout controls for supported sections and widgets.
Adjust the content width
Long paragraphs are usually easier to read within a controlled content width rather than stretching across the entire screen.
Review the box model
The layout controls may include:
- Margin
- Padding
- Border
- Width
- Height
- Alignment
- Positioning
Use consistent spacing
Apply similar spacing between headings, paragraphs, images and sections so the article feels balanced.
Check the mobile layout
Columns that look good on desktop may need to stack vertically on smaller screens.
Layout principle
Use width and spacing controls to improve readability instead of filling every available area of the screen.
Step 15: Customise Colours and Branding
You can edit supported section backgrounds, text colours, buttons and other visual elements.
Change the blog header background
Select the blog header or hero section and open its background settings.
Depending on the section, the background may support:
- Solid colour
- Image
- Video
- Embed
- SVG
Use brand colours consistently
The blog should feel like part of the same LearnWorlds school rather than a separate website.
Maintain readable contrast
Dark text should appear on a sufficiently light background, while light text should be used on a sufficiently dark background.
Use the Theme Explorer for broader changes
If you want to change colours, typography, buttons or general school styling across multiple pages, use the school’s Theme Explorer rather than editing every post individually.
Do not sacrifice readability for branding
A brand colour may look attractive but still be unsuitable behind body text when the contrast is too weak.
Step 16: Configure the Blog Post SEO Settings
LearnWorlds provides an SEO area for blog posts.
Automatic SEO extraction
The platform may automatically extract SEO information from the post.
Manual SEO customisation
You can disable automatic extraction and customise the SEO information manually.
Review the following:
- SEO title
- Meta description
- Page slug
- Search-engine visibility
- Social-sharing information
- Featured image
Write a clear SEO title
The title should describe the post accurately and include the main topic naturally.
Write a useful meta description
Summarise the benefit of the article in a way that helps search users decide whether to visit the page.
Do not rely on SEO settings alone
Search visibility also depends on the article’s usefulness, structure, internal links, website quality and competition.
SEO principle
Use accurate titles, descriptions and slugs, but focus primarily on creating genuinely helpful content.
Step 17: Preview the Blog Post
Preview the post before publishing it publicly.
Check the desktop version
Review:
- Title size
- Content width
- Image quality
- Paragraph spacing
- Buttons
- Links
- Header and footer
Check the mobile version
Confirm that:
- Text is readable
- Images fit the screen
- Columns stack properly
- Buttons are easy to tap
- No content is cut off
- Videos resize correctly
Proofread the content
Check grammar, spelling, facts, dates, links and calls to action.
Test all links
Open internal and external links to confirm they lead to the intended destination.
Preview principle
Review the post as a visitor on both desktop and mobile devices before changing its status to Public.
Step 18: Publish the Blog Post
Once the article is complete, save the final changes and change the post status to Public.
Confirm the public URL
Open the post in a new browser window and verify that it is accessible without administrator access.
Check the main blog page
The new article should appear with the correct:
- Title
- Featured image
- Description
- Category
- Publication date
- Author
Share the article
You can promote it through:
- Email newsletters
- Social media
- Course announcements
- Community posts
- Related lessons
- Internal links from other articles
Publishing principle
Publish only after confirming that the post works publicly and displays correctly on the main blog page.
How to Manage Existing LearnWorlds Blog Posts
LearnWorlds allows you to edit and manage existing posts after publication.
Properties tab
The Properties area can be used to:
- Edit the page name
- Copy the public URL
- Change the post between Public and Draft
Post Info
The Post Info area can be used to change:
- Author
- Description
- Publication date
- Featured image
- Categories
SEO tab
The SEO tab allows you to review automatic SEO extraction or customise the metadata manually.
Update older articles
Refresh outdated screenshots, instructions, links, course recommendations and platform information when necessary.
Move unfinished posts back to Draft
If an article requires major corrections, you can temporarily return it to Draft while completing the update.
Management principle
Review published posts regularly and keep their content, images, categories and SEO details accurate.
What Should You Publish on a LearnWorlds Blog?
Course-related tutorials
Teach readers a practical skill connected to one of your courses.
Beginner guides
Create introductory articles for visitors who are not yet ready to enrol.
Student success stories
Share genuine examples of how learners have applied your training.
Industry updates
Explain relevant changes that affect your audience.
Course announcements
Introduce new courses, modules, instructors or learning programmes.
Frequently asked questions
Turn recurring support or sales questions into detailed articles.
Comparison posts
Help readers understand the differences between approaches, tools or professional options.
Resource lists
Recommend useful books, tools, templates, videos or services related to your teaching topic.
Content principle
Choose topics that solve real audience problems and connect naturally to your school’s learning products.
Common LearnWorlds Blogging Mistakes to Avoid
Publishing without categories
A disorganised blog becomes harder to browse as more posts are added.
Using vague post titles
The title should explain the subject and benefit clearly.
Ignoring the post description
A missing or weak description can reduce the quality of blog listings and previews.
Uploading oversized images
Large files can slow the page and affect the reading experience.
Changing published slugs repeatedly
This can create broken links and search-engine problems.
Using too many layouts
Every post should not look completely different. Consistent design improves brand recognition.
Ignoring mobile design
A layout that works only on desktop excludes many potential readers.
Publishing AI content without checking it
Generated content may contain errors, repetition or unsuitable claims.
Forgetting a call to action
Relevant posts should help interested readers discover a suitable course, resource or next step.
Failing to update old posts
Platform tutorials and industry information can become outdated quickly.
Keep the reader’s goal central
Design and SEO settings are useful, but the article must still answer a real question or solve a meaningful problem.
LearnWorlds Blog Setup Checklist
Blog and post details
- Blog page is active
- Blog name is clear
- Blog description is complete
- Post title is descriptive
- Slug is short and accurate
- Status is set correctly
- Publication date is correct
- Category has been assigned
- Description has been added
- Featured image is optimised
- Author is correct
Design and publishing
- Post uses a readable layout
- Headings follow a logical structure
- Colours match the school brand
- Text contrast is accessible
- Images and videos resize properly
- Desktop layout has been reviewed
- Mobile layout has been reviewed
- Links have been tested
- SEO title is complete
- Meta description is complete
- Public URL works
Final Verdict: How Do You Set Up a Blog in LearnWorlds?
To create a blog in LearnWorlds, begin by opening the Website area and locating the Blog or blog-post management section.
Configure the main blog page with a clear name, useful description and appropriate public URL.
Create a new article using a premade template, blank template or one of the available AI-assisted options.
Complete the title, slug, status, publication date, categories, description, featured image and author information.
Use the visual editor to add sections and widgets, adjust the content width, improve spacing and match the article to your school’s colours and typography.
Review the SEO settings, test the post on desktop and mobile and publish it only when the content and design are complete.
After publication, manage the article through its Properties, Post Info and SEO tabs, and update the content whenever information changes.
Our recommendation
Create one consistent blog-post template and reuse it for future articles. This will save time, maintain brand consistency and make the blog easier for readers to navigate.
Frequently Asked Questions
Does LearnWorlds include a blog?
Yes. LearnWorlds includes a built-in blog feature for publishing and managing articles within your school website.
How do I create a blog post in LearnWorlds?
Open the Blog area, click the plus icon or add-new option and choose a template, blank layout or AI-assisted creation method.
Can I create a LearnWorlds blog post with AI?
Yes. Current LearnWorlds tools may allow you to enhance a template with AI or generate a complete blog-post draft from a prompt.
Can I start from a blank template?
Yes. A blank template allows you to build the post layout manually using sections and widgets.
Can I add categories to LearnWorlds blog posts?
Yes. Categories can be assigned through the post-information settings to help organise related articles.
Can I change the featured image later?
Yes. The featured image can be updated through the Post Info area.
Can I change a published post back to Draft?
Yes. The Properties area allows you to switch the post between Public and Draft status.
Does LearnWorlds generate a slug automatically?
LearnWorlds can generate the post slug from the title, but you should review and correct it before publishing.
Can I customise the blog-post layout?
Yes. The website editor allows you to add sections, widgets, backgrounds, images, videos and custom layout settings.
Can I customise the SEO information?
Yes. You can use automatic SEO extraction or disable it and enter your preferred SEO information manually.
What should I post on my LearnWorlds blog?
Publish tutorials, course updates, student resources, frequently asked questions, industry insights and other content relevant to your learners.
How often should I publish?
Choose a schedule you can maintain while preserving quality. Consistent helpful content is more valuable than publishing frequently without a clear purpose.
Need Help Designing or Managing Your LearnWorlds School?
Teemikemedia Agency helps course creators configure LearnWorlds websites, blogs, course pages, payment systems, learner dashboards and branded content layouts. We can build or improve your school so it presents your training professionally and supports a smooth learner experience.
Official references
LearnWorlds may update its interface, blog options and AI features. Review the current official documentation when dashboard labels differ from this tutorial.
LearnWorlds: How to Create a Blog in Your Online School
LearnWorlds: How to Manage Your Blog Posts
LearnWorlds: Creating Pages and Page Structure
LearnWorlds: Add and Customise Page Sections
LearnWorlds: Using the Layout Tab